

Step 3 - Creating questions page
First of all you should set up your spreadsheet. Watch this video on how to do that. You need the following sheets -
You then can add the questions. Leave the answers out to begin with as these will be added later. Also do not worry about design yet. Just get the text in. This video will help you get a feel for laying your quiz out. You can see the first step of the spreadsheet by clicking here.
 |
Make sure you have designed the questions first. If you have not STOP! Design them! |
Now it is time to add your design. It is really advisable NOT to use images as backgrounds. You can add a single image as a background in Excel but this does tend to make text hard to read. Look at this example spreadsheet and notice how the images and colours are used. You can see how this was made by watching this video.
|
Do not be afraid of creating images in GIMP and then adding them to Excel. This is the secret to procue the best work! |
Next you need to add responses. We will be using the developer tools in Excel to do this. The developer ribbon may not be visable but if you -
Click on the office button ![]()
Click on Excel options ![]()
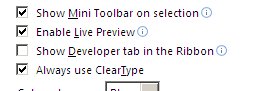
Then click on the "show Developer tab in the ribbon" . This will then show the developer ribbon. You can then add dropdown menus by watching this video and looking at this example
Once you have fully created your questions page make sure you ask your teacher to look over it.