

Step 3 - Adding validation
Validation is where you restrict what can be entered into a field. This is to try and prevent incorrect values from being entered. The example data items file shows what validation is required. The screen shot below shows an example -
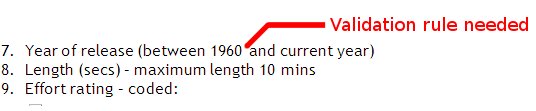
This needs a rule which only allows years to be entered between 1960 and 2009 (or what ever year it currently is!). The field below can not be any bigger than 10 mins (or 600 seconds).
 |
If a field has a condition written down in the data items document then you must add a validation rul |
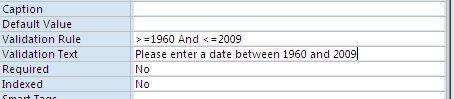
The above screen shot shows where you enter your validation rule and what it will look like. To write a validation rule you must enter a condition followed by a value. For example < 600 means "less than 600". The smbols you can use are -
Symbol |
Name |
Description |
| > | Greater than | Only allows bigger numbers |
| < | Less than | Only allows smaller numbers |
| >= | Greater than or equals | Only allows bigger numbers or ones which are the same |
| <= | Less than or equals | Only allows smaller numbers or ones which are the same |
| = | equals to | Must be the exact same |
| <> | Not equals to | Must NOT be the same as |
| And | And connector | Connects two validations rules together (both must be true) |
| Or | Or connector | Connects two valudation rules together (either could be true) |
To add validation rules you can follow this video.
|
Text fields can only use the =, AND, OR and <> symbols in validation rules. |

Coded fileds must be written out like the above screen shot. Notice that the codes are surrounded in "quotation" marks. They are connected together using OR. All coded filelds will be written in the same way.
Once you have added all of you validation rules make sure you take screen shots. See the step 2 example on what this may look like.
Resources
| Adding validation rules |
| Screen shot example |